We are a regular Mumbaikar working-couple and spend a big part of our everyday life between work and commute.
The rising levels of pollution we were experiencing in a mega-city like Mumbai always bothered us. Urban pollution, as well as the threat to contamination of natural resources, is a global problem, and in a developing country like ours, the municipal land-fills stand out on this front.
We knew about the Deonar dumping ground fire in 2017 and the accompanying air pollution. This could have been avoided if, as a city, we knew how to better manage the volume of waste generated every day.
We were feeling that as citizens each little step that we take, in our homes, was definitely going to make an impact on the larger chain. The waste we ourselves were generating was on our minds for a while. We were thinking of composting our organic wet waste, but our busy work schedules, and the fact that we live in a two-bedroom flat with no balcony was holding us back.
We knew that it’s not adequate to just think and express concern, and it’s more important to take some action, but action on our end was waiting. Till lockdown happened!
With COVID-19, we started working from home. The municipality’s focus shifted to the virus. They were short-staffed, and we found that the collection of segregated waste was getting affected. We saw that the burden on our systems was increasing. With so much medical waste to be processed, we felt it’s good to reduce our home-waste burden on civic bodies.
We were fortunate to have someone in our neighbourhood to guide us on how to go about home composting, and to help us remove the barriers we had in our minds. We were convinced, and decided that it was time to take action.
Four things needed to start
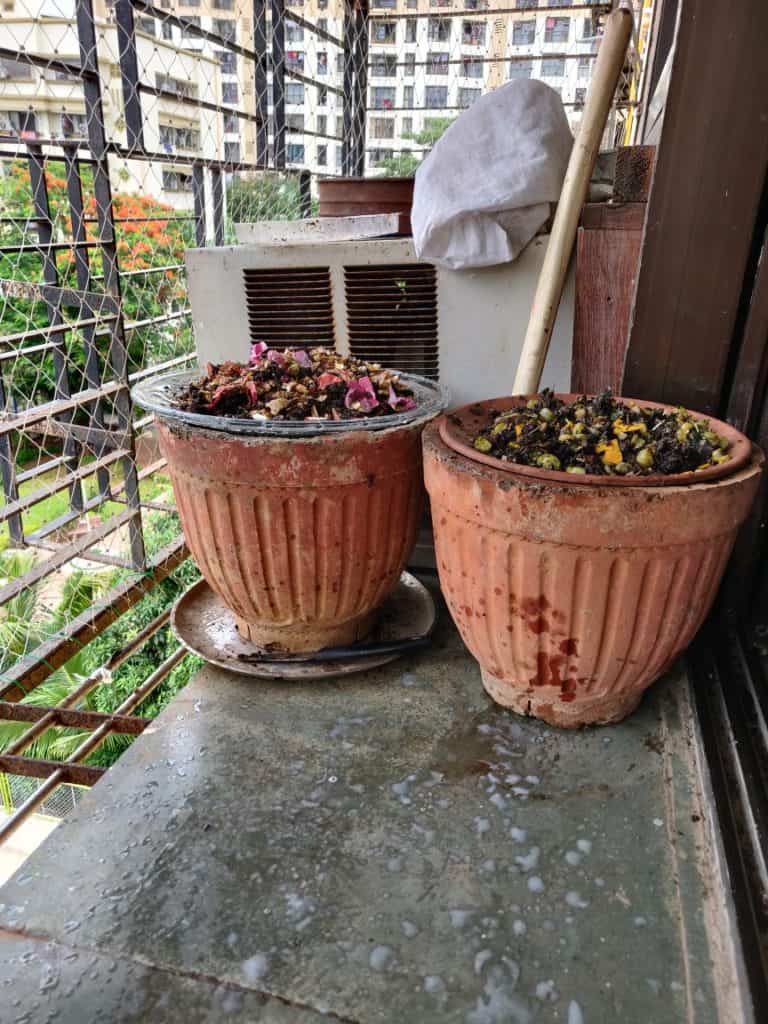
1. Space – We used a 18” x 30” window-sill space, for placing two pots, side by side. You can also choose a corner in the balcony, or an airy corner in any other place of your home, where no one will disturb these pots
2.Pots/Bins/Cover/Base – We used two flower-pots, around 12” tall with a 12” diameter. We got this from our society garden, someone had discarded them. To cover one pot, we used an old clay tava that was lying at home – instead of discarding it, we took off the metal handle. There’s plenty of material available around us which can be easily repurposed. It’s easier to buy, but remember, less waste is our purpose. When you start, you can start with these sizes, as you progress, you will develop a good estimation, on the basis of the actual waste generated in your household and can always adjust to a different container. Even an old plastic bucket, with minor cracks can be used, with some care. And, place a plate at the bottom to collect any liquid that seeps out.
3.Starter – While starting out, if you have friends who do composting, ask them for a handful of compost, to use as a starter. If not, a sprinkling of chaas or buttermilk on top of the wet waste will do the job. Yeast powder can also be used to start the biological breakdown. Basically, we need microbes to breakdown all food material till such time none is left. Our environment already has different types of bacteria and fungi and these play a key role in composting. When we use a starter, this makes the process faster.
4.AND, last but not least, you need to devote just 10 mins every day!
Step-by-step
Step 1 – Setting up the bin
Ensure that the bin/pot you have chosen has a small hole for liquids to drain out. Cover the base, up to 1” with a handful of starter (old compost) or shredded newspaper or coconut fiber. You can also use dry leaves for the base layer.
Step 2 – Adding wet waste
Chop down all vegetable waste (including peels, hard parts) into smaller pieces, before adding to the bin + also squeeze out extra moisture/ liquid/ filter it out through a strainer. This waste is now ready to be added to the bin/pot.

Step 3 – Getting it started
If you have already added old compost at the base, simply keep adding your wet waste and stir it up twice a day. If not, sprinkle a handful of buttermilk or sprinkle some dry yeast to get this started. There are a lot of microbes in the air, so don’t worry, it will start decomposing pretty soon.
Step 4 – Cooking/composting
As you add wet-waste layer after layer, every day, remember that this mixture is being eaten up by various microbes and there is rapid decomposition that is happening. Use a sturdy stick to give it a good stir and aerate it twice a day. Keep the lid covered. You will see small white worms and/or maggots eating away, sometimes in good numbers. That’s normal, do not panic. This is nature’s way of breakdown.
Step 5 – Regular checks
Watch out for any lumps. If there’s too much moisture, it may cause lumping and that may delay the composting. If you find any rotting smell, the cause is usually again, high moisture. You can add some crushed dry leaves / ready compost and it will get alright in a day. Do not panic. Nature is at work. If you see the volume of the pot coming down or the mixture ‘heating up’ or getting warm, that’s a great sign. Eventually, what will be left is the final compost.
Step 6 – Starting the second pot
Usually for a small household, you may require two pots, to manage continuing the process. The overall process takes around 40-45 days, which means Pot 1 will fill up in some time and you simply need to keep it covered and give two stirs in a day. You can start with Pot 2 in the meantime. And after the compost is ready in Pot 1, you can empty it for drying/storage and re-start the same process with it.
Step 7 – Compost is ready
If there is heat/warmth in the mixture, it means the process is still on. When the compost is ready (around 45 days), there’s almost no microbial activity, the mixture is blackish/brown in color and has a moist earthy, pleasant smell. At this stage, it’s a good idea to sieve the compost and leave it to dry completely before storing it. The lumps and undone remains, if any, can be put back into Pot 2, where the process would be going on.

What to do to avoid moisture
– Squeeze out the kitchen waste, so that it’s pretty dry when added to the bin.
– Before adding to the pot, leave the kitchen waste out to dry in air, mixed with some compost from the pot (where the process was already on). This helps in drying the mix + starting the process, instead of just rotting there in the open.
Learning as we progress – Some dos and don’ts of home composting
Always segregate the Dry (inorganic) from the Wet (organic)
Make sure no dry waste like plastic, glass etc goes into the bin. Clean plastic pouches before you throw them into the dry waste bin, to ensure they don’t carry food particles. Thus, you can avoid further pollution/contamination and facilitate safer handling
Try to up-cycle for a composting bin instead of buying stuff (e.g use an old flower-pot)
Always try to repurpose existing resources. We found two discarded flower pots in our society garden. Often, the matka-walas sell away pots with tiny imperfections for a pittance. Or you can use a thick, sturdy discarded plastic bucket, which has a broken handle, instead of throwing it away.
Avoiding lumps due to moisture / 5 mins extra effort works wonders
We were particular to squeeze out all wet waste, before putting it into the pots. We didn’t get any leachate at all. And the process was smooth. Leachate is not bad, it’s harmless, but sometimes, you may not find the sight of a brown liquid accumulating below the pots very pleasant.
Chop down large pieces of waste (like cabbage heads, pineapple skin)
A lot of fruit and vegetable peels may be thick, hard and it’s best to chop them down if you want to manage process easily. That’s what we followed and it may not be possible for everyone. The time taken to compost will vary therefore, depending on the size of the waste chunks you put in.
Managing bones, egg shells, etc.
We are vegetarians so we didn’t face the challenge of managing bones and egg shells. Usually their decomposition time is longer. This may prove to be a challenge during home composting. Our friend and mentor, who guided us at every step, told us that even dropping mango seeds is fine, it just takes a little longer to break down. In our case, we have dried up several seeds and are planning to give it to people who want seeds.
Similarly, coconut shells are another challenge, they are really hard and will take ages to breakdown. We plan to smoothen them using sand-paper and paint them into bowls or holders.
In conclusion
We’re totally in love with composting. This is a journey we are committed to. We have stopped sending out any wet waste from our home. It’s a very proud feeling that we are able to do our bit for the planet. All thanks to the lockdown that forced us to stay home.
If anyone requires guidance in home-composting, please reach out to us at the email IDs provided below. We are eager to help.
[All pics provided by authors.]
Great work Srinivas & Shuba! Space is the biggest constraint for me at the moment, will still try.
Hello! Of course, in Mumbai that’s a challenge, however like we mentioned, we’ve used a 1.5 ft x 1 ft + space to do this. Do give it a try 🙂
Dear Raju n Mrs Raju,
You are doing a great service to the Humanity!!! Kudos to you!
Kannan
Mysore
Thank you ?? for your kind words. Please do share this around, it’s important that all of us do this.
Thank you so much ?? for your appreciation and wishes !
Good initiative, innovation and good effort. Congrats and good wishes.
Thank you so much ?? for your appreciation and wishes !
I have a earthen pot full of composting waste since 2months. It is still dense till the tip so unable to churn it well. How will I know if it is done?
Hi! The pots have to be stirred well, in order to facilitate aeration and hence further breakdown. Usually, with good progress in composting, the volume reduces. Also initially the mixture feels warm to touch and later, once it’s done, it cools dow.
Since you say it’s dense, it’s probably not done yet. Please send me a pic on my email id and I can get back.
I would like to know about, what do you do with this compost which you prepare at home
We can use it for our own house plants or society garden. Can also be gifted to friends who nurture plants.
I was collecting all the fruits and vegetable peels in one of the pot without wet waste for two months,after in dried,I had put it in the mixer,to bring it to powdery form,and have stored.but now I find lump in that…should I mix it along with the mud in all the planted pots…? please guide me
Basically because it was simply dried and didn’t go through a composting process, it may have retained some moisture leading to lump formation. I don’t know how much moisture this lump may have and in case if it’s more, it’s possible there’s some other growth of microbes which may be harmful. I suggest you leave it, loosely mixed with the pot where you compost the wet waste and leave it to properly compost.
Congrats for the good work you are doing ?? I wanted to know after how many inches of wet waste can we add dry leaves. How often do we add buttermilk or yeast?
Regards…
Thank you. Buttermilk or yeast needs to be added at the beginning to kick start the composting process. Not after that. Actually the lesser the moisture better will the mixture proceed.
On adding dry leaves, if the compost mixture is relatively dry, there’s no need to add dry leaves. If your home plants have dry leaves, you can anyway crush and add them along with the wet waste.
Truly inspiring to read. I have been wanting to do it for a long time and you have pushed me to get started. Kudos to both of you.
You had mentioned to place the pots in any space that’s airy and where there is no disturbance to the pots. Is it ok to place it outside the house but where the pots would be exposed to light and rain? Since you mentioned moisture in the pot delays the process want to check
Can we add leftover cooked food into the compost pot? Thankyou
Yes, you can. Just ensure, you squeeze out excess liquids from them, before dropping them into the compost pot. The liquids are not an issue but they will delay the drying and hence the composting cycle. Plus, if not we’ll stirred regularly, they may lead to lump formation
It should not be exposed to rain, else it will get excess moisture. Sunshine is ok. You need to keep the pot covered loosely, preferably with a earth cover
Thank you so much for your kind words. Please do no hesitate to reach out to us, at any point (email id given below) in case of doubts. We are happy that you are getting started.
Hello Mrs Subha Iyer,
Great post and share. I have been contemplating to do this for a long time now but haven’t started yet. Small space and the thought of foul smell in the house holding me back.
Your post has encouraged me to take the leap!
Thank you.